A day off from work meant my first attempt at a hike in almost a month. And this time I wanted to try Lone Pea k via School House Springs. I scouted out this trail last fall, making it just past the second hamangog (meadow). I arrived at the trail head in the city of Alpine at 7:45 and was on my way a couple of minutes after that.
The trail begins basically right next to a house with a small makeshift parking area for maybe four cars. The trail follows a four wheel drive road and is very easy going for the first 2.9 miles to the first hamongog, with one exception. There is one spot where the road forks - what looks to be a road comes in from the left which looks like another switch back. In a few yards, this way narrows and it becomes obvious that it is not the 4-wheel drive road that you should be on. But to save a few extra unneeded steps, when the trail forks, stay straight.
The books I have mention that at a point in the four wheel drive trail (at the fifth switchback), you take a route north (straight ahead) called the "Lone Peak Trail" instead of switching back and following the road to avoid private property. Based on my previous experience where I took the Lone Peak Trail on the decent, I ended up hiking through the private property on the way up and down because the Lone Peak Trail is brutally steep and only saves .07 of a mile each way.
Once arriving at the first hamongog, a sign marks the Lone Peak Wilderness and the four wheel drive road ends. In the middle of the meadow, a sign marks trail 200 which continues on to the second hamongog. At this point, a trail also comes in from the right (east) and heads, I’m told, to lake Hardy and South Thunder Mountain.
The trail to the second hamangog actually heads in a south westerly direction at first, and I wondered last fall if I was on the right trail. Eventually, it turns back north, giving you a great view of Utah county for much of the way to the second hamongog. About halfway in between the two meadows there is a camp site which looks to be often used. From the first hamongog, it took me about 1.4 miles to reach the second hamongog.
Almost completely across the meadow is a sign marking the way to Lake Hardy via a trail that comes in from the right (east). It says that it is two miles to reach the lake. I’ve read that it is better to take this junction to get to lake Hardy instead of the one from the first hamongog, but it seems as though it would add a couple of miles to the trip.
To reach Lone Peak, continue straight, or north, right at Lone Peak. .22 miles after leaving the second hamangog, a faint trail comes in from the right which can be easily missed. This trail heads in the most direct way up to Lone Peak. From what I’ve read and been told, you can continue on the main trail (west) and reach Lone Peak from the North but this adds a few miles to the trip. If you want to reach Lone Peak from the south, heading to the south summit before attempting the true summit, take the faint trail that comes in from the north.
From this trail, the climbing begins. The trail starts off docile enough but soon the trail fades and it is just a matter of ascending drainage’s and/or climbing over slabs of granite and boulders. This was easily the toughest part of the hike and I had to take many rest stops because of the steepness of the way. It didn’t help matters either that the air was filled with smoke due to the Milford Flat fire (the biggest wild fire in the state of Utah to date). One key here that kept me going in the right direction was once to the drainage, there will be a large cliff band to your right (east) and a smaller cliff band (more like a ridge) to your left (west). At first, you’ll stay clo se to the small cliff band to your left, but as soon as you get out of the drainage area, you’ll want to make your way to the top of the large cliff band on your right. It is just north of the large cliff band where you’ll make your way to the ridge.
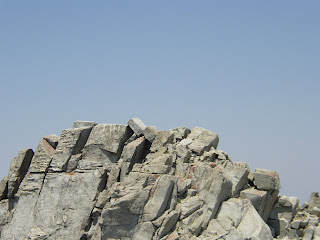
Once near the top of the large cliff band that was on your right, head in a northerly direction towards the ridge. There are two cairns that mark the spot on the ridge. Just before the ridge, I carabined my trekking poles to my camelback as a short class 3 section began. After the short class 3 climbing, it is only a short class 2 hike over tundra and small granite rocks to reach the base of the summit to South Lone Peak. Here again, there is another bit of easy class 3 climbing to reach the summit of South Lone Peak at 11,200 feet.
There is a few hundred feet between the South Summit and the true summit. The whole way is class 3 with maybe a few class 4 moves also. If you are a little fearful of heights or not much of a risk taker, the south summit would be a great ending point. If you’re up for a thrill and have enough energy left, the main summit is attainable. I down climbed to the saddle of the granite blocks between the two summits but was about out of gas. I looked to see where my next move would be and saw I would have to down climb to some dirt below and then climb steeply up to reach the main summit. The climbing looked much more vertical than I had done thus far and because I was not in great shape yet for the season, I decided to head back to the south summit and call it a day.
For me one of the hardest parts of the class 3 climbing was remembering the way I had come so I could return the same way. A couple times I had to backtrack because I had gone the wrong way and taken my self to a sheer cliff.

The way back down was as planned and I made good time. Descending the drainage in parts was actually harder than ascending it because of how steep it was. And after my boots got a little mud on them, hiking down the slabs of granite was nearly impossible with out slipping.
I made it back to the car at 3:00. The whole trip took me 7 hours and 10 minutes and registered 11.8 miles on my GPS. I think the next time I try Lone Peak, I will try it from the Cherry Canyon trail.
 k via School House Springs. I scouted out this trail last fall, making it just past the second hamangog (meadow). I arrived at the trail head in the city of Alpine at 7:45 and was on my way a couple of minutes after that.
The trail begins basically right next to a house with a small makeshift parking area for maybe four cars. The trail follows a four wheel drive road and is very easy going for the first 2.9 miles to the first hamongog, with one exception. There is one spot where the road forks - what looks to be a road comes in from the left which looks like another switch back. In a few yards, this way narrows and it becomes obvious that it is not the 4-wheel drive road that you should be on. But to save a few extra unneeded steps, when the trail forks, stay straight.

The books I have mention that at a point in the four wheel drive trail (at the fifth switchback), you take a route north (straight ahead) called the "Lone Peak Trail" instead of switching back and following the road to avoid private property. Based on my previous experience where I took the Lone Peak Trail on the decent, I ended up hiking through the private property on the way up and down because the Lone Peak Trail is brutally steep and only saves .07 of a mile each way.
Once arriving at the first hamongog, a sign marks the Lone Peak Wilderness and the four wheel drive road ends.
 In the middle of the meadow, a sign marks trail 200 which continues on to the second hamongog. At this point, a trail also comes in from the right (east) and heads, I’m told, to lake Hardy and South Thunder Mountain.
The trail to the second hamangog actually heads in a south westerly direction at first, and I wondered last fall if I was on the right trail. Eventually, it turns back north, giving you a great view of Utah county for much of the way to the second hamongog. About halfway in between the two meadows there is a camp site which looks to be often used. From the first hamongog, it took me about 1.4 miles to reach the second hamongog.
Almost completely across the meadow is a sign marking the way to Lake Hardy via a trail that comes in from the right (east). It says that it is two miles to reach the lake. I’ve read that it is better to take this junction to get to lake Hardy instead of the one from the
 first hamongog, but it seems as though it would add a couple of miles to the trip.
To reach Lone Peak, continue straight, or north, right at Lone Peak. .22 miles after leaving the second hamangog, a faint trail comes in from the right which can be easily missed. This trail heads in the most direct way up to Lone Peak. From what I’ve read and been told, you can continue on the main trail (west) and reach Lone Peak from the North but this adds a few miles to the trip. If you want to reach Lone Peak from the south, heading to the south summit before attempting the true summit, take the faint trail that comes in from the north.
From this trail, the climbing begins. The trail starts off docile enough but soon the trail fades and it is just a matter of ascending drainage’s and/or climbing over slabs of granite and boulders. This was easily the toughest part of the hike and I had to take many rest stops because of the steepness of the way. It didn’t help matters either that the air was filled with smoke due to the Milford Flat fire (the biggest wild fire in the state of Utah to date). One key here that kept me going in the right direction was once to the drainage, there will be a large cliff band to your right (east) and a smaller cliff band (more like a ridge) to your left (west). At first, you’ll stay clo
 se to the small cliff band to your left, but as soon as you get out of the drainage area, you’ll want to make your way to the top of the large cliff band on your right. It is just north of the large cliff band where you’ll make your way to the ridge.
Once near the top of the large cliff band that was on your right, head in a northerly direction towards the ridge. There are two cairns that mark the spot on the ridge. Just before the ridge, I carabined my trekking poles to my camelback as a short class 3 section began. After the short class 3 climbing, it is only a short class 2 hike over tundra and small granite rocks to reach the base of the summit to South Lone Peak. Here again, there is another bit of easy class 3 climbing to reach the summit of South Lone Peak at 11,200 feet.
There is a few hundred feet between the South Summit and the true summit. The whole way is class 3 with maybe a few class 4 moves also. If you are a little fearful of heights or not much of a risk taker, the south summit would be a great ending point. If you’re up for a thrill and have enough energy left, the main summit is attainable. I down climbed to the saddle
 of the granite blocks between the two summits but was about out of gas. I looked to see where my next move would be and saw I would have to down climb to some dirt below and then climb steeply up to reach the main summit. The climbing looked much more vertical than I had done thus far and because I was not in great shape yet for the season, I decided to head back to the south summit and call it a day.
For me one of the hardest parts of the class 3 climbing was remembering the way I had come so I could return the same way. A couple times I had to backtrack because I had gone the wrong way and taken my self to a sheer cliff.

The way back down was as planned and I made good time. Descending the drainage in parts was actually harder than ascending it because of how steep it was. And after my boots got a little mud on them, hiking down the slabs of granite was nearly impossible with out slipping.
I made it back to the car at 3:00. The whole trip took me 7 hours and 10 minutes and registered 11.8 miles on my GPS. I think the next time I try Lone Peak, I will try it from the Cherry Canyon trail.